Lesson 10: Keypad Input
Lesson 10: Keypad Input
Lesson: Keypad Input
Objective: At the end of this lesson, you will be able to read input from a keypad matrix using Arduino.
Materials Required:
- Arduino board
- Keypad matrix (e.g., 4x4 or 3x4)
- Jumper wires
- USB cable
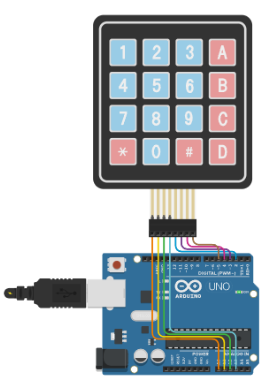
Circuit Connections:
- Connect the columns of the keypad matrix to digital pins on the Arduino board.
- Connect the rows of the keypad matrix to analog pins on the Arduino board.
- Connect a 10k-ohm resistor between each row pin and ground (GND).
Arduino Code:
#include <Keypad.h>

const byte ROWS = 4; // Number of rows in the keypad matrix
const byte COLS = 4; // Number of columns in the keypad matrix

char keys[ROWS][COLS] = {
  {'1', '2', '3', 'A'},
  {'4', '5', '6', 'B'},
  {'7', '8', '9', 'C'},
  {'*', '0', '#', 'D'}
};

byte rowPins[ROWS] = {A0, A1, A2, A3}; // Analog pins for rows
byte colPins[COLS] = {2, 3, 4, 5}; // Digital pins for columns

Keypad keypad = Keypad(makeKeymap(keys), rowPins, colPins, ROWS, COLS);

void setup() {
  Serial.begin(9600); // Initialize serial communication for debugging
}

void loop() {
  char key = keypad.getKey(); // Read the pressed key

  if (key) {
    Serial.print("Pressed Key: ");
    Serial.println(key);
  }
}
Experiment Steps:
- Set up the circuit connections as described above.
- Connect the Arduino board to your computer using a USB cable.
- Open the Arduino IDE software and create a new sketch.
- Install the "Keypad" library by going to "Sketch" -> "Include Library" -> "Manage Libraries" and searching for "Keypad". Click "Install" to install the library.
- Copy and paste the provided code into the Arduino IDE.
- Click the "Upload" button to upload the code to the Arduino board.
- Open the Serial Monitor in the Arduino IDE (set the baud rate to 9600).
- Press the keys on the keypad and observe the corresponding output in the Serial Monitor.
Explanation: In this experiment, we are using the Keypad library to read input from a keypad matrix. The keypad matrix consists of rows and columns, and each key press connects a specific row and column. By scanning the rows and columns, we can determine which key is pressed.
The setup() function initializes the serial communication for debugging purposes. We use the Serial.begin(9600) statement to set the baud rate to 9600.
The loop() function continuously checks for key presses using the keypad.getKey() function. If a key is pressed, the corresponding character is stored in the key variable. We then use the Serial.print() and Serial.println() functions to display the pressed key in the Serial Monitor.
You can modify the keys array to customize the characters assigned to each key. Make sure the dimensions of the array match the number of rows and columns in your keypad matrix.
Remember to follow safety precautions while working with electronic components and circuits.


Comments
Post a Comment