Lesson 8: LCD Display without I2C
Lesson 8: LCD Display without I2C
Lesson: LCD Display without I2C
Objective: At the end of this lesson, you will be able to display text on a 16x2 LCD using Arduino without using I2C communication.
Materials Required:
- Arduino board
- 16x2 LCD display module
- Potentiometer (10k-ohm)
- Jumper wires
- USB cable
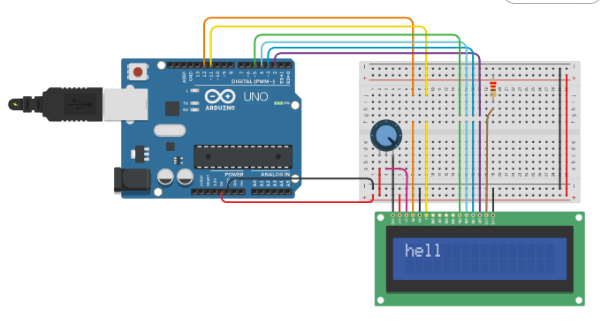
Circuit Connections:
- Connect the VCC pin on the LCD module to the 5V pin on the Arduino board.
- Connect the GND pin on the LCD module to the ground (GND) pin on the Arduino board.
- Connect the V0 pin on the LCD module to the wiper (middle pin) of the potentiometer.
- Connect one end of the potentiometer to the 5V pin on the Arduino board.
- Connect the RS pin on the LCD module to digital pin 12 on the Arduino board.
- Connect the RW pin on the LCD module to ground (GND).
- Connect the E pin on the LCD module to digital pin 11 on the Arduino board.
- Connect the D4, D5, D6, and D7 pins on the LCD module to digital pins 5, 4, 3, and 2 on the Arduino board, respectively.
Arduino Code:
#include <LiquidCrystal.h>

LiquidCrystal lcd(12, 11, 5, 4, 3, 2);

void setup() {
  lcd.begin(16, 2); // Initialize the LCD with 16 columns and 2 rows
  lcd.print("Hello, World!"); // Display text on the LCD
}

void loop() {
  // No actions required in the loop
}
Experiment Steps:
- Set up the circuit connections as described above.
- Connect the Arduino board to your computer using a USB cable.
- Open the Arduino IDE software and create a new sketch.
- Copy and paste the provided code into the Arduino IDE.
- Click the "Upload" button to upload the code to the Arduino board.
- Observe the text "Hello, World!" displayed on the LCD module.
- Experiment with modifying the displayed text and LCD settings to customize the output.
Explanation: In this experiment, we are using the LiquidCrystal library to control a 16x2 LCD display connected to the Arduino board. The library provides functions to initialize the LCD, set the cursor position, and print text on the LCD.
The setup() function is used for the initialization of the LCD. We create an object of the LiquidCrystal class called lcd and pass the pin numbers of RS, E, D4, D5, D6, and D7 to the constructor. The lcd.begin(16, 2) statement initializes the LCD with 16 columns and 2 rows. Finally, we use the lcd.print("Hello, World!") statement to display the text "Hello, World!" on the LCD.
The loop() function is empty in this example because we don't need any continuous action in the loop.
You can modify the code to customize the displayed text and experiment with other LCD functions provided by the LiquidCrystal library.
Remember to follow safety precautions while working with electronic components and circuits.


Comments
Post a Comment